Friday, March 7, 2014

I think I meant to post this in March...

Despite my absence, I swear I've been busy! Goose's second birthday was the last day of February. When we brought him home from the hospital (5 days later) there wasn't any snow on the ground. At 2 weeks old we went for a walk outside and I didn't have coat on. Therefore, I find it perfectly unacceptable that we were reaching the end of February with mounds of snow on the ground and more in the future. Woof. I needed a spring infusion and I needed it fast.
First thing I did was recover this large down pillows we had (you can see one in the background of the top photo with the floral print). They were hand me down pillows that I had recovered when we first moved into our house 4 years ago. I knew the covers were too small, but it wasn't until I went to update them that I realized how bad they were. It squeezed the pillow to half the size and was bulging out of the back. Double woof. 10 minutes later I had bright springy covers on them and they are the squishiest comfiest things ever.

So then I turned my attention to some other pillows that needed some TLC. The pillow form was an outdated pillow I bought from Pottery Barn years ago. I wanted a bright cheerful cover that, again, could be made quickly. I used the Economy Block Tutorial from Red Pepper Quilts and couldn't believe how easily it all came together!

Next my mantle needed a pick me up. I've been eying some paper piecing patterns out there and loved these Robins from Tartankiwi on Craftsy. They were perfect to dig into my scrap bag for (thought the background does take more than scraps). I ended up buying a couple of fat quarters for them when I got the end and realized I had used all my "good" fabric colors up already.


This one was my first and is my absolute favorite!


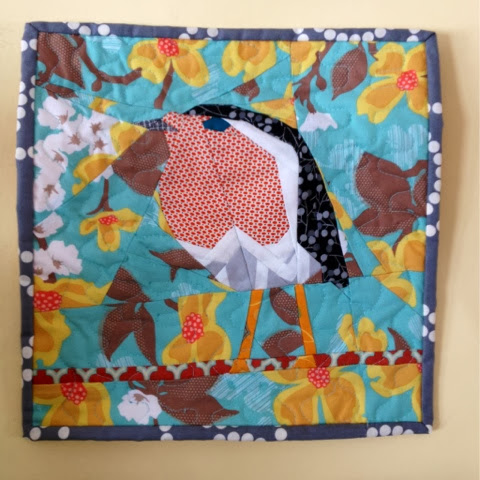
Though this one comes in a close second...


Here's a shot of them hanging over my mantle. I used a dowel pocket (not sure if that's the quilting term, but it's what we called it back in my trade show days!) on the back and a command strip on either side of the pocket to hang them. After changing out the mantle decor every few months that poor wall has had a lot of nails!


Lastly, I threw a "Gnome and Woodland Animal" themed party for Goose's second. There were quite a few sewn elements, including gnome hats for all the kids (that mostly ended up on the adults heads!) but this was my favorite piece of "decor".


It was the first time I had done a stacked cake and the first time I had used fondant beyond cupcake toppers. Obviously the leaves are a bit crazy and I would have assembled them different next time, but I kind of love this cake.

Though I think I should point out that it was never my intention to have a birch tree with oak leaves. I was picturing a stand alone house with birch siding and leaves for a roof, but the roots sort of just happened and next thing you know I had one very confused tree.


It was super hard to cut into (like emotionally difficult, not physically difficult)!

Project Bag Complete!

Whomp, apparently I've been terrible about updating. My project bag is finished...and has been for awhile now, but I put it to immediate use and never photographed it. Oops. And in my sleep deprived state (thank you toddler who can get out of his bed now and 3rd trimester pregnancy sleep!) I can't think forward enough to take a better photo than hanging off the chair in my makeshift studio/playroom!

Is it okay to be in love with a bag? I love this bag. The pattern is the Crafty Traveler from Ellison Lane. More on my cosmic connection to this bag in my last post. A brief run down again: the feather fabric is one I designed on Spoonflower, the vinyl leather handels are leftover from Goose's diaper bag, the orange pearl bracelet and green arrows are from the lovely $2.99/yd fabric store near me and the blue chevrons on the inside are my Spoonflower design as well.


The pattern is great, but I knew I was going to need a little more secure storage. First I added an interior pocket and in front of that pocket a large (full length of the side) slip pocket out of heavy interfacing. This is perfect for me to store small embroidery or felt projects without them getting lost at the bottom of the bag. I probably use this pocket more than anything.


I also added a recessed zipper on top. It's the first time I've tried this so it's not perfect, but I'm happy enough with the results. And it definitely works as this bag gets thrown around!


Lastly I chose to use the same outside fabric all the way around (this pocket with the Urban Threads embroidery pattern (the stitches are a little wonky because of the water solvent transfer paper I used that I won't be using again!):


I was trying to use supplies that I already had in my stash, especially after the cost of the Spoonflower fabrics! Luckily I had the zipper (though I would have preferred an orange one!), the fabrics, Thermolam and the heavy interfacing. I didn't have the Shape Flex. A little research told me that Shape Flex makes quilt weight fabric feel like canvas. You know what else feels like canvas? Canvas. And that I have plenty of so I used my trusty double sided fusible webbing to secure the lining fabric to the canvas to give it some extra heft. Definitely extra steps, but it didn't cost me a penny (I like to think money I previously spent just some how disappears).

Now to stuff my bag more full of projects...

Wednesday, February 12, 2014

Project Bag

I have a ton of canvas tote/market bags from my old Etsy shop and they are wonderful for most of my storage/toting needs. However, like every other bag I have, they are wide open at the top and stuff falls out like it's on a mission. For the past few months I've been dreaming of a good sized, multi pocketed, zippered bag just for my projects.

My dreams were getting elaborate. Very elaborate. Prohibitively so. I didn't even know how to do half the things I imagined. And I'm not talking "an opportunity to learn new things", I mean it may not have been physically possible.

Fast forward to a couple of weeks ago. I have a habit of reading my feedly list in the middle of the night (leftover from when I was up nursing Goose every night). I save posts that I later want to add to Pinterest, but thanks to my half wake/half sleep state I often don't remembered what I save. Imagine my surprise to find that I had saved a post called the Crafty Traveler Bag from Ellison Lane. The sewing gods were smiling down on me.

Of course there are tweaks I'm going to make, but its the perfect jumping off point for this bag.

For more perfection, I had just ordered a yard of the first fabric I had designed. I had been looking for fabric, hoping it would inspire a bag design and hadn't found a thing. Thanks to photoshop and spoonflower, I had ordered my own design and just enough for what I needed!


THEN, I stumbled upon the lovely Urbanthreads and everything seemed to fall into place! I downloaded this pattern ($1!) and set to work the next day. It's going to make the perfect outside pocket.


Here are all the outside fabrics. The linen for the side panels and pockets, the vinyl leather for the handles, the feathers for the base.


And the lining fabrics (I also designed the blue chevrons to coordinate with the feathers). The orange pearl bracelet will be the main lining, the green feathers for the interior pockets and slip pocket and the blue chevrons for this large folder style slip pocket.

I'm super excited to get this made up!

Wednesday, February 5, 2014

WIP Wednesday

I feel like I've gone and overwhelmed myself again. As predicted, I put my goals out there and then get crazy and feel like I "must" complete everything I assigned myself. So when I start working on random projects that strike my fancy I feel bad, as if I'm not accomplishing the correct things. Sewing is my outlet, it's my fun thing, it's not supposed to feel like work!

I do have a couple of projects that I've been working on:

The most recent in my Sugar BOM Club (stitched on a lovely snowy day while listening to She & Him on Pandora... very relaxing!):


Center diamonds for the Maple Rag Quilt from Material Obsession. These are the perfect project for those times when I just want to sew and not think about it. I need 128 of them to make the size in the book so I figure it's a good small project to pick up here and there to keep me from getting overwhelmed.


The beginning of a Gardening Busy Book page for Goose:


Recovering bolster pillows and making a slip cover for the nursery rocker (no photos, it's not particularly fun to look at!)


But then there's my major distractions...

-I just found Threadbias and have spent an inordinate amount of time there. What a wonderful group of supportive sewists! And of course now I have a million more ideas in the vault.

-Discovering pictoral paper piecing. Of course I've seen it around, but for some reason it just recently sank in and I may have spent a good hour on Flickr this morning oohing and aahing over the talent of these artists. And of course all wouldn't be right in the world unless I jumped in with a ridiculous difficult (and probably impossible) design of my own. Now just to get some quiet time to test some scraps on it.


-Waiting, most impatiently, for some very special fabric that is supposed to arrive tomorrow. I'm going to use it for my project bag and have been trying to plan every detail before it comes so I can cut right in. Of course, I'm just realizing that I'm supposed to be hosting book club here tomorrow so that will seriously cut into my sewing time. Blah!

I've been putting off...

-My cousins' Sunshine Half-hexagon quilt... For some reason I'm wishing I could just jump to the hand-quilting part. I need another dose of spring like weather to tackle that.

-The squirrel embroidery for my woodland quilt. It's all traced on to the fabric and in the hoop, I just can't seem to pick up the thread.

-Lucky stars BOMs. I'm no longer in the groove with the fabrics I started with so it's feeling a little "off". The colors are so rich and jewel like which was totally the mindset I was in at the beginning of the year (in the dead of winter) but now I'm drawn to lighter fabrics as I obsess over nicer weather.

Hopefully next week will show some work on the "Putting offs" just so I keep moving on them!

Tuesday, February 4, 2014

Busy Book: Letters (Page 1)


With the end of April, and therefore the Chipmunk(!), in our sights (and by sights I mean that it was 45 degrees yesterday and despite the snow storm that's rockin' right now, I take that as a sign of spring), I thought I should give some thought to a gift for Goose when Chippy is born. After thinking long and hard I realized that more than anything I want to keep him busy. Sure there are plenty of lovely things out there that accomplish that task, but far be it for me to take the easy road. So I hit Pinterest for some Busy/Quiet Book inspiration.

First up: Letter Page

Now I know that Goose at the ripe age of 24 months cannot, and should not, identify letters, but he knows what they are as an image and will gleefully sing out "E! A! D!" to the tune of "ABC". He loves pointing out letters on his toys so I figured he may like this as well. Hopefully it will grow with him and he can practice the real letters and spelling as he gets older (as if there is any chance all the letters will stay with the book!).


I love this photo. The table is one that my dad made me for my 2nd birthday that Goose uses for his coloring projects. The chairs I picked up at Brimfield Antique Fair last May. It's all just so freakin cute together!

I appliqued all the letters to the backing felt with embroidery thread. It would have been easier to use fabric glue, but past experience showed me that he will rip those suckers off the moment he can.


The pencil is just for fun.


I painstakingly used a blanket stitch for every color on the pencil and then realized it was too flimsy to put in the little holder. I ended up using a zig zag stitch to secure a piece of heavy weight Pelon interfacing on the back. Next time I have a little piece like that I'll sandwich it between two pieces of felt or include it in the blanket stitch.


I used the Imagine Our Life tutorial for how to bind the pages with a few changes. First I cut the quilting fabric about 1/4" larger all around. Next I fused double sided webbing (my most favorite "making" product ever!" to the wrong side of the quilting fabric. Putting right sides of the fabric and the felt page together I sewed a 1/4"seam using the felt page as a guide (it means there's a 1/2" edge to the quilt fabric which I wanted for durability), leaving an opening on the grommet side. Lastly I turned it inside out, pressed the fabric side to fuse it to the felt page and top stitched around everything. it makes the page about 1/2" smaller all around, but I prefer the more finished look.

The pages look a little lumpy here because all the letters are in the envelope. The two pages really do line up nicely when not stuffed.

Oh and I LOVED using the grommet pliers. LOVED.


I know I'm supposed to wait until Chipmunk gets here to show Goosey the page, but I couldn't help myself. He immediately got the idea, opened it up and started placing letters on the page, dropping his train set and animals in the process, which for a 2 year old is a REALLY. BIG. DEAL.


He even took out the pencil to "draw". Nothing makes me happier than putting so much work into something to see that he actually likes it (not always the case)! Now to put it away until April and start brainstorming more pages!


Monday, February 3, 2014

Dopp Bag

I've got my eye on a couple of big bags (a weekender and project bag) but I'm waiting on some special fabric for them. In the meantime I'm knocking off some of the smaller bags on my mental list. Next up was a Toiletry (or Dopp, which just sounds much more fun) bag. Because if I remember anything from my hospital stay when Goose was born it was that my toiletry bag was an embarrassment (please note heavy sarcasm).

I found this fantastic and easy to follow tutorial for a box bag by Truly Myrtle. Though of course I had to make a couple of additions!


First off I used a heavy interfacing, fused to the fabric with double sided webbing, for a more structural design. Next I used some iron-on vinyl I found at Joann's to make the inside waterproof. If I didn't do it, I know there were would bottles of shampoo popping everywhere. Now that I have done it, I'm sure nothing will ever spill.

Lastly, I included two very shallow (2.5" deep) zippered pockets on either side of the interior for jewelry. My original plan was to put them on the outside and then for some reason I brushed that off and went on the inside. Now I'm remembering that the outside plan was so that I could access the jewelry without having to empty the bag. Doh.

All in all I love this little bag. It's not all that small either at 12" long by 4" high by 6" wide. I found it a little tough to get all those heavy and stick layers turned right side out at the end and had rip out more of the stitching than was called for, which then had to be resewn by hand and doesn't look as clean as I would like. Next time I think I'll also put a pull tab for the zipper on the other side as well. But the instructions were clear and for my first bag I think it turned out just fine!
 

Can I also say that I ADORE the exterior fabric? Love in a ridiculous way. I nearly couldn't bring myself to cut it... but hopefully I'll see it more frequently this way than sitting in a fabric pile somewhere!

Sunday, February 2, 2014

February Goals

Ah! February already! That much closer to warm weather and the new babes! I feel like I have to get in the bulk of my sewing now since who knows what life will be like with two munchkins. Coincidentally, this is also how I approach my fabric purchasing as I'm *sure* I wont be buying so frequently come the end of April.


Completed in January
-Nursery curtains (I'll post about when I finish the nursery)
-Dopp bag (I'll post this week)
-Handbag
-Lucky Stars BOM: Both January and practice blocks (need to re-do at least one)
-Sugar BOM: January
-Sewing accessory zipper pouch
-Sparkle Punch Quilt
-6 Maple Rag Leaf center diamonds
-Printed 40 Dishtowels for my Dad's Store
-Printed 12 tote bags for Goose's 2nd Birthday Party (will post later)
-Made 12 Gnome hats for party (will post later)
-Designed 2 fabrics in 2 colorways and had printed by Spoonflower (will post as soon as I get them!)
-Embroidered one panel for Woodland quilt

Started but Not Finished
-Confused Flying Geese Quilt
-Sunny Hex Quilt
-Quiet Book Pages for Goose: Letters

Goals for Completion in February
-Bolster pillow covers for nursery
-Project Bag
-Sunny Hex Quilt
-12 Maple Rag Leaf center diamonds
-Another Confused Flying Geese Quilt quadrant
-Cut and Prep for Amy Butler Weekender Bag
-Quiet Book Pages for Goose: Letters
-3 More Quiet Book Pages
-Design 1 fabric
-Embroider 2 panels for Woodland Quilt