Thursday, October 16, 2014

Lucky Stars Attempt #2


In January I joined the Lucky Stars Block of the Month club by Don't Call Me Betsy. I started strong and had a vision of jeweled colored stars used only from stash fabric. After a month or two I was almost dreading it. My vision was falling very, very, very short and I was running out of fabrics I wanted to use. And did I mention I wasn't liking my blocks at all?


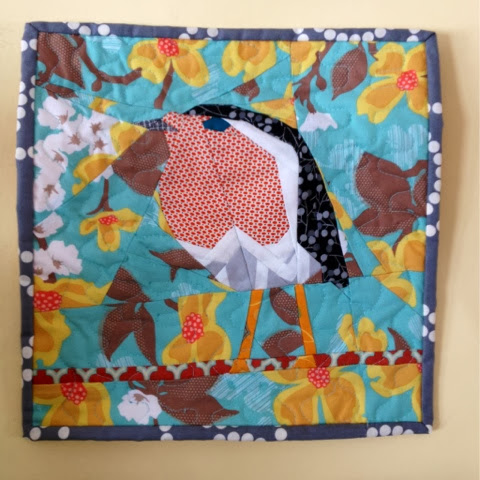
Fast forward a few months and a fair amount of paper piecing experience later and I had a much better vision. I wanted really warm and bright tones, something that would fit in with the summer, when all we need on our bed is a light quilt, and keep me happy in the dark doldrums of winter. "Luckily" my stash had grown by then and I only needed to add a little bit here and there to round it out.


So far I'm loving this series. Not every one of them is a hit of course, but when it's all assembled I think it will really come together.


I have dreams of having this done by Christmas, but only have 4 out of 24 done (I signed up for both 2013 and 2013 patterns). Oh and then I plan on hand quilting... so maybe Christmas 2015??


Tuesday, October 14, 2014

Quilted, Knit and Sewn Autumn Pillows


I never used to decorate for the seasons (the obvious exception being Christmas of course!). A few years ago I started changing up the art above my mantle and the wreath on my door. Then, with my total and utter (redundant) disgust with winter this year I needed to go with a full decor change and started sewing spring-like pillows with abandon.

As much as I loved the bright and airy pillows in March, I needed some cozy and autumn pillows come September. First up was to change the economy block pillow and I immediately thought of Anna Maria Horner's feather pattern. I love me some feathers but I knew I didn't have the patience to do a whole quilt in them. 

I took the general pattern and hacked a bit off the bottom to fit my pillow size. I usually prefer items in odd numbers so just two feathers bothers me but so it is.
 

Next up was a squishy, cozy cabled pillow cover. I hinted to a knitting friend that I wanted one until I realized that I could probably figure it out myself. It's my first attempt at cabling (using this pattern) and not without issues. Including (but not limited to!) not having circular needles in the right size and not buying enough yarn.

In the end I knit the front flat, knit the back flat in stockinette stitch, basted both to muslin and then sewed it all up. It still needs some toggle buttons and it's not the cleanest work, but it was fun to make and adds a wonderful color and texture to my couch!


Have I mentioned how much I love texture?? It's why I love fabric so much and with my new found love of knitting it's texture overload over here! Here are my 4 new fall colors. I kind of just want to dive right in.


Texture close up. The fabric on the big down pillows in the back is from a local $2.99/yd store. It's hit or miss there but this time was definitely a hit. These are (I think) high quality suiting material. Super thick and extra gorgeous.

I'm going to go lay about in my pillows now...

Saturday, October 11, 2014

Spiked Apple Cider Socks


Last fall I got the Knit Itch. It had happened on occasion and this time was heavily fueled by my new found friendship with the British woman who lived across the street. She is a legit knitter. Like we grew up without electricity so you learned to knit kind of knitter. Or maybe it was indoor plumbing. Yeah, I think they didn't have indoor plumbing. Either way everyone learned to knit gorgeous fair isle treasures.

So I picked up some needles and knit Goose a terrible pair of socks from yarn I had on hand. Ever try putting socks, still on the needles, on an 18 month olds foot to try for size? Terrible idea. So they were different sizes and I think the heel was on the front of the sock for one of them. 

But I was inspired to try again. This time I thought I was hot stuff and found an real sock pattern on Ravelry (Simple Skyp socks by Adrienne Ku) and bought real wool yarn (Patons Dark Grey Marle). Real, as in, not acrylic. As in, I thought I was moving up in the knitting world. WHO BUYS WOOL NON-WASHABLE YARN FOR SOCKS?? Oh and it was worsted weight. Also a smart move. The pattern called for sport weight (which meant nothing to me).

I frogged them no less than 5 times before picking them up again after the Christmas stocking project. It was then I started to recognize my errors. Error # 1) the washableness. #2) The weight. #3) Swatching, what? #4) My lovely bi-color cozy wool did not show the stitch definition at all and this pattern was all about the stitch. Error #5) I bought one skein (yardage? what's that?). Luckily Michaels still carried it a year later and the colors are so simple that if the dye lots were different I can't tell.

So I re-started them on a family trip in July. I believe I had to ask my Aunt how to cast on because I couldn't remember for the life of me (oh how long ago July seems!). And that first sock took from the beginning of July until the end of August. I wasn't working on it constantly but it dragged. And I'd forget the pattern and then I water-logged the pattern. And they were never. going. to. be. finished.

Eventually I realized the beautiful sock in the pattern photo wasn't going to happen because of all the aforementioned issues. So these would be more cozy slipper socks. This was later confirmed as I tried on my first finished sock and realized it was too thick to even wear with my tall boots. I re-framed my vision.

In the new vision these were clearly comfy winter socks. Sit by the fire with my spiked apple cider and knit kind of socks. I finished them up earlier in the week and when today hit, the first below 50, rainy, time to build a fire autumn Saturday I knew the socks time had come. And lo and behold I had leftover spiked cider in the fridge from a party. (This recipe by the way and delicious!). Clearly the socks were meant to be and I have some super toasty tootsies.


On to the next project with this delightful wool. And this, my friends, is stitch definition. The skyp pattern would adore this wool (if it were the right weight... I've learned my lesson!).

Tuesday, September 23, 2014

Quick Little Baby Snowdrop Hat


Hubby's cousin had his first baby, a little girl, over the weekend. We can't wait to meet her and so in the meantime I thought I'd knit a little hat! I purchased a bunch of baby-esque yarn prior to Goose being born so I was able to raid my stash for the little bits this hat needs.


It was super easy to knit up. I started it last night after dinner and with some knitting then, some more at the park today and a bit over naptime and voila! I'm done!

Yarn: The pink is a DK weight as it's what I had on hand. If I had worsted I would go down a needle size for the ribbing. Upper level yarns are both worsted.

Needles: size 5 DPNs

Cast on 64 stitches in first CC
Rows 1-10: *K2, P2* repeat to end, break yarn
Rows 11-12: Knit MC
Row 13, 17, 21: *K1(MC), K1(CC)* repeat to end of row
Rows 14, 16, 18, 20, 22: Knit (MC)
Rows 15, 19, 23: *K1(CC), K1(MC)* repeat to end of row
Row 24: Knit (MC)
Row 25: Knit (CC)
Row 26: *K6, K2Tog* to end
Row 27: Knit
Row 28: *K5, K2Tog* to end
Row 29: Knit
Row 30: *K4, K2Tog* to end
Row 31: Knit
Row 32: *K3, K2Tog* to end
Row 33: Knit
Row 34: *K2, K2Tog* to end
Row 35: Knit
Row 36: *K1, K2Tog* to end
Row 37: Knit
Row 38:*K2Tog* to end
Cut tail, thread through rem stitches and weave in all ends. Add pom pom!


I feel like it may be a little small. Definitely a newborn hat though I was shooting for more of a 0-3month. I know that my babies could never wear newborn hats with their big bowling ball heads! Next time I'd cost on at least 72 stitches and another repeat of snowdrop stitches.

Also, all the yarn is acrylic. Ech. Like 100% acrylic. The white and sandstone aren't too bad but the pink is super squeaky. I think it's good for a baby hat because there's nothing to itch her but if I were buying yarn for this project I'd look for something soft and wooly and squeak-less. I think I'll make Chipmunk a hat next with the same pattern but not

Thursday, September 18, 2014

Lilly Pulitzer Baby Quilt


First, I apologize for these photos. I was on my way out the door to give it to my friend and realized I hadn't photographed it yet. iPhone + toddler trying to roll on it does not equal great photos.

A dear friend (and the only who shares my passion for all things fabric) Loves. loves. loves Lilly Pulitzer. Like lives it, breathes it, hoardes it, and sells it online (here!). Before her I thought it was just a line of dresses that looked vaguely Floridian. Since meeting her I'm pretty good at identifying "Lilly" from a (short) distance and I've grown to appreciate the designers affinity for pairing wild animals and alcoholic beverages. I also have access to a huge stash of Lilly scraps that collectors would probably give their right arm for.

When my friend told me she was pregnant with her second and planning a nautical nursery I knew that I had to get my hands on those scraps.


(Wow these colors above are way off! And super blurry!) I found the pattern for the sailboats from PieceByNumbers on Etsy.


Another thing about my friend... she loves color and pattern. Like loves it nearly as much as she loves Lilly. I had to audition 3 bright pinks before her before she agreed that the one I used for the binding wasn't "neutral"! So I used as many patterned fabrics as I could and prayed that it wasn't too "neutral" or too crazy.


When Cotton and Steele debuted we were a wee bit obsessed so that obviously had to make it in there. And then I snagged whale fabric at my LQS and even though it didn't seem like a good fit at first I really love how it gives the lower sea some depth.


Free motion quilting was, as always, a pain. I actually love doing it and I love the effect, but I'm terrible at it. I don't know if it's my skills (probably) or my machine (probably not) but I'm constantly breaking thread and making beautiful little nests on the back of the quilt. It seems I've tried every needle and thread weight under the sun but it always ends up the same.


I love these fish. They were a last minute addition and I was inspired by a quilt photo I can't find anymore so I slapped together a paper template myself which explains why they are a bit wonky.


I hope she likes it!!


Friday, September 5, 2014

Sunshine Quilt

When I started this I had some sort of bizarre dream that I would be peacefully finishing up the handquilting while in the maternity ward after Chipmunk was born. I think because I spent 5 boring days at the hospital with Goose that the same would happen. Instead, I was beyond exhausted at the end so there was no energy for quilting, then she was a week late and we spent less than 48 hours in the hospital. Poof! Dreams were gone.

Then it was a rush to finish quilting it because I forgot how freakin exhausting the first months are and she was a good sleeper even early on!

So the quilt that I started in January so that I would have some sunshine during an otherwise gray and seemingly unending winter... was finished in July. Whoops.

And then of course I couldn't find the photos I took and had to sheepishly ask my cousin to send me some. I'm sure that didn't sound narcissistic at all!


I love how wrinkly a hand quilted quilt can get!

Goose's Fishy Hat

After Chipmunk's stocking I had a new love of knitting. Unlike quilting I didn't need to hole myself up in a sewing room covered in threads and with little bits of fabric strewn everywhere. I could binge watch Netflix with the hubs, have coffee with my girlfriends or kill time at a doctor's appointment while being productive.

While looking through patterns on Craftsy, I found this adorable fish hat . I had similar colors in the stash of yarn I've slowly accumulated for various craft projects and thought I'd give it a go.

A few things: I was still trying to figure out a stranding technique: how to hold the yarn so it didn't pull, when to twist it, how to read a pattern-- all foreign to me. Thank god for YouTube. And the pattern designer, Lisa McFetridge, told me I picked a difficult project for my first stranding. Which makes me feel equal parts crazy and proud!

Also, gauge meant nothing to me. Check the gauge? That must be like pinning when sewing... Useless. Turns out it's not terribly useless at all. Different yarns, different needles, different knitters all end up with different gauges. Lesson learned. (Woof, look at that mess down below! Full disclosure here...)

Then there's that whole "measure the head" thing. Why in the world did I think Goose would fit into a youth size hat?? My dear 2.5 year old who comes from a family of large noggins, who had always been off the charts head size, who can't wear turtleneck shirts, who has never fit into a toddler size hat....sure lets make him a youth size hat.

So the technique was a work in progress, the gauge is a bit small and luckily I switched to an adult cast on before I started though I had only printed a chart for the youth size printed out and had to ad-lib a bit.

It's tight. Like let's- you-a-hair-cut-and-hope-that-makes-it-fit-better-tight. Again, the pattern designer came to the rescue and suggested steam blocking. So I'm going to cross my fingers this isn't acrylic (I really don't think it is?) and give it a go!


I've now attempted two more stranded colorwork (I don't even know if I'm throwing this terms around correctly!) hats that have been much, much, much more successful. I can't wait to get them up here to redeem myself :)

And as a side note...

Chipmunk woke up for an early morning snack at 5am today. I stupidly took that nursing time to look on Ravelry which got the wheels spinning which means I didn't fall back asleep. Today is going to be rough, but this cool, misty, almost-autumn morning with a zebra mug full of hot tea, a lap full of quilt, and a house full of sleeping family is my One Moment and I'm loving it. Thanks for indulging a little Pinterest inspired moment. I feel like I should throw in #blessed or something... :)


Tuesday, September 2, 2014

Chipmunk's Christmas Stocking

As kids we had the most amazing(-ly tacky) stockings. My mom ordered them all hand knit for me, my siblings and my cousins. I was pretty sure they were the best thing ever and they have been faithfully holding our goodies from Santa ever since.

Ready for this photo of 80s goodness?


Fast forward a whole bunch of years and I had been married for a year and realized it was time to get the hubs a good stocking. Lo and behold, my knitter friend found the same pattern and whipped up one for him!

The following year Goose came along, and my knittery friend had a little one of her own, so I trolled Etsy and found someone to make me one.

Last year I dug out my siblings stockings and put together this Christmasy delight:


So earlier this summer I went looking for that seller only to find that she no longer has a shop. Not good. Other sellers made the same pattern but it was going to set me back $100. Understandable for a hand knit treasure but I had a hard time ponying up that much for such tackiness. 

My next thought was an obvious one: I can do stockinette stitch so how hard can this be? I found the pattern on Mary Maxim and got to work.


There was lots frogging (like how I throw around knitting terms? It means ripping out.. Rip-it, rip-it... Get it??!). And research on intarsia vs stranding. I went with a (poor) intarsia job.


But I learned a lot: how to do multiple colors, mattress stitch, duplicate stitch, weaving ends (which apparently I didn't do) and how much I dislike knitting with acrylic yarn. And this is really acrylic, like buy it by the truckload for $2 acrylic. Which also luckily means I'll have enough to make stockings for all the woodland creatures in our family to come!

Friday, March 7, 2014

I think I meant to post this in March...

Despite my absence, I swear I've been busy! Goose's second birthday was the last day of February. When we brought him home from the hospital (5 days later) there wasn't any snow on the ground. At 2 weeks old we went for a walk outside and I didn't have coat on. Therefore, I find it perfectly unacceptable that we were reaching the end of February with mounds of snow on the ground and more in the future. Woof. I needed a spring infusion and I needed it fast.
First thing I did was recover this large down pillows we had (you can see one in the background of the top photo with the floral print). They were hand me down pillows that I had recovered when we first moved into our house 4 years ago. I knew the covers were too small, but it wasn't until I went to update them that I realized how bad they were. It squeezed the pillow to half the size and was bulging out of the back. Double woof. 10 minutes later I had bright springy covers on them and they are the squishiest comfiest things ever.

So then I turned my attention to some other pillows that needed some TLC. The pillow form was an outdated pillow I bought from Pottery Barn years ago. I wanted a bright cheerful cover that, again, could be made quickly. I used the Economy Block Tutorial from Red Pepper Quilts and couldn't believe how easily it all came together!

Next my mantle needed a pick me up. I've been eying some paper piecing patterns out there and loved these Robins from Tartankiwi on Craftsy. They were perfect to dig into my scrap bag for (thought the background does take more than scraps). I ended up buying a couple of fat quarters for them when I got the end and realized I had used all my "good" fabric colors up already.


This one was my first and is my absolute favorite!


Though this one comes in a close second...


Here's a shot of them hanging over my mantle. I used a dowel pocket (not sure if that's the quilting term, but it's what we called it back in my trade show days!) on the back and a command strip on either side of the pocket to hang them. After changing out the mantle decor every few months that poor wall has had a lot of nails!


Lastly, I threw a "Gnome and Woodland Animal" themed party for Goose's second. There were quite a few sewn elements, including gnome hats for all the kids (that mostly ended up on the adults heads!) but this was my favorite piece of "decor".


It was the first time I had done a stacked cake and the first time I had used fondant beyond cupcake toppers. Obviously the leaves are a bit crazy and I would have assembled them different next time, but I kind of love this cake.

Though I think I should point out that it was never my intention to have a birch tree with oak leaves. I was picturing a stand alone house with birch siding and leaves for a roof, but the roots sort of just happened and next thing you know I had one very confused tree.


It was super hard to cut into (like emotionally difficult, not physically difficult)!

Project Bag Complete!

Whomp, apparently I've been terrible about updating. My project bag is finished...and has been for awhile now, but I put it to immediate use and never photographed it. Oops. And in my sleep deprived state (thank you toddler who can get out of his bed now and 3rd trimester pregnancy sleep!) I can't think forward enough to take a better photo than hanging off the chair in my makeshift studio/playroom!

Is it okay to be in love with a bag? I love this bag. The pattern is the Crafty Traveler from Ellison Lane. More on my cosmic connection to this bag in my last post. A brief run down again: the feather fabric is one I designed on Spoonflower, the vinyl leather handels are leftover from Goose's diaper bag, the orange pearl bracelet and green arrows are from the lovely $2.99/yd fabric store near me and the blue chevrons on the inside are my Spoonflower design as well.


The pattern is great, but I knew I was going to need a little more secure storage. First I added an interior pocket and in front of that pocket a large (full length of the side) slip pocket out of heavy interfacing. This is perfect for me to store small embroidery or felt projects without them getting lost at the bottom of the bag. I probably use this pocket more than anything.


I also added a recessed zipper on top. It's the first time I've tried this so it's not perfect, but I'm happy enough with the results. And it definitely works as this bag gets thrown around!


Lastly I chose to use the same outside fabric all the way around (this pocket with the Urban Threads embroidery pattern (the stitches are a little wonky because of the water solvent transfer paper I used that I won't be using again!):


I was trying to use supplies that I already had in my stash, especially after the cost of the Spoonflower fabrics! Luckily I had the zipper (though I would have preferred an orange one!), the fabrics, Thermolam and the heavy interfacing. I didn't have the Shape Flex. A little research told me that Shape Flex makes quilt weight fabric feel like canvas. You know what else feels like canvas? Canvas. And that I have plenty of so I used my trusty double sided fusible webbing to secure the lining fabric to the canvas to give it some extra heft. Definitely extra steps, but it didn't cost me a penny (I like to think money I previously spent just some how disappears).

Now to stuff my bag more full of projects...

Wednesday, February 12, 2014

Project Bag

I have a ton of canvas tote/market bags from my old Etsy shop and they are wonderful for most of my storage/toting needs. However, like every other bag I have, they are wide open at the top and stuff falls out like it's on a mission. For the past few months I've been dreaming of a good sized, multi pocketed, zippered bag just for my projects.

My dreams were getting elaborate. Very elaborate. Prohibitively so. I didn't even know how to do half the things I imagined. And I'm not talking "an opportunity to learn new things", I mean it may not have been physically possible.

Fast forward to a couple of weeks ago. I have a habit of reading my feedly list in the middle of the night (leftover from when I was up nursing Goose every night). I save posts that I later want to add to Pinterest, but thanks to my half wake/half sleep state I often don't remembered what I save. Imagine my surprise to find that I had saved a post called the Crafty Traveler Bag from Ellison Lane. The sewing gods were smiling down on me.

Of course there are tweaks I'm going to make, but its the perfect jumping off point for this bag.

For more perfection, I had just ordered a yard of the first fabric I had designed. I had been looking for fabric, hoping it would inspire a bag design and hadn't found a thing. Thanks to photoshop and spoonflower, I had ordered my own design and just enough for what I needed!


THEN, I stumbled upon the lovely Urbanthreads and everything seemed to fall into place! I downloaded this pattern ($1!) and set to work the next day. It's going to make the perfect outside pocket.


Here are all the outside fabrics. The linen for the side panels and pockets, the vinyl leather for the handles, the feathers for the base.


And the lining fabrics (I also designed the blue chevrons to coordinate with the feathers). The orange pearl bracelet will be the main lining, the green feathers for the interior pockets and slip pocket and the blue chevrons for this large folder style slip pocket.

I'm super excited to get this made up!